Oct 31, 2011

From a Caterpillar to a Butterfly ~ costumes!

Last year, my son wanted to be the Very Hungary Caterpillar for Halloween. The costume, if bought, would cost something ridiculous like upwards of $50. So I got to work plotting my own costume.

 It was really quite simple to do. I used less than a yard of light green fabric and cut two pieces the length of my son's body. I sewed on some dark-green felt and some shiny fabric in horizontal rows. I also made some brown legs out of felt (so that they'd be pretty stiff once stuffed) and sewed them onto the sides. Then I cut the two vertical sides of the costume into 1" strips and tied them in knots (you know, like those "no-sew" blankets?).
 Then, at the top and bottom of the costume, I cut small 1/2" vertical slits so that I could thread some green ribbon through to cinch the top and bottom.
 For the hat, I used one piece of red fleece and tied it up the back after cutting it into strips (like the "no sew blanket"). I stuffed some blue felt for the antennae in the open top and knotting the openings closed with two strips of fleece. Then I sewed on the eyes and nose. It worked!
 
Since last Halloween, my son has been plotting this year's costume. 
What does a caterpillar turn into?
A "spooky" butterfly, of course! And it had to be a monarch. (totally his idea)
I bought the wings on sale at Joann's (@$8). Got the black long johns on sale at Target ($8). Used a plastic headband that I also bought at Target (3 for $3) and attached pipe cleaners and pom poms that I had already.
And that's it! We've already had some fun trick-or-treating this weekend around the mall and also about town. Looking forward to the big event tonight!
Linking up here:


Oct 30, 2011

A Triple Rosette Pin in Turquoise

Lately, I've been busy making jewelry and hair clips for a community fundraising event. 
When I handed everything over to the charity's director (so that she could pass it along to the folks organizing the raffle, silent auction, etc.), she mentioned that she loved the turquoise color of one of the necklaces (seen in this post). She also, very nonchalantly, said something like it would make a good pin and she liked pins. Now this is a woman who has done so much over the years for this particular organization and my family and I have benefited from her hard work. 
So of course I made her a pin. In turquoise. And put it on her desk a week later. I hope she liked it. :)
Linking up here:


Oct 28, 2011

Necklaces, Earrings, and Hair Ties to Donate

 So these were the "mom items" that I donated to the community fundraiser along with the little girl hair clips. I made a new grey necklace (the other one I was planning on keeping, but---long story short---I gave it away on the spot to a sweet grandmothery person who admired it and had just given me a bunch of cute clothes for my daughter through Freecycle.org. Anyway, I had to make another necklace and ended up doing two new gray ones -- one for me and one for the fundraiser. (I haven't photographed the one for myself yet, but it has 5 pom poms that are on the larger side like the poms below!)
 I did two hair ties. (Made a third one for myself and I have to say, they really do dress up a ponytail!).
 And some earrings.
 (These pictures are so dark because I took them in the early morning before packing them up in my bag to head out. Got done too late at night for anything to look half-way good. ;-)


Good-bye new gray necklace! I hope your new owner likes you!
Linking up here today:
Our Creative Spaces

Hair Clippies for Charity ~ What I Gave


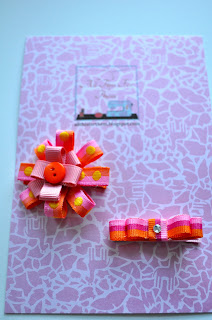
I did a bunch of hair clips last week for a charity fundraiser in my community. It was fun experimenting in different ways with ribbon and it felt good to give some of my time (and craftiness) to a good cause! 


I really liked doing the duckie and the firefly -- but they look a little more sticky and lumpy in their photo than in person - darn!

You might recognize my pinwheel below. I did some before on an earlier post.
I really like how this little pink rosette looks on a clippie. Very classy, I think. Not so sure about the one next to it...
And this last one I just made the other day for my daughter. Can you tell what it is?? 
A pumpkin, of course! :)
Linking up here today:


Oct 21, 2011

Little Rosette Earrings ~ Tutorial

I have been into rosettes lately and thought, if they look good on hair clips and necklaces, why not earrings?
  So here is my little tutorial on making little rosettes for the ears.

If you like bigger-sized earrings, go with 1" strips of fabric and knot them at the top.
 Or if you liked small, daintier earrings, go with .25" strips and knot them (I did both to compare.)
Pinch the knot (with the very end face-down) and wrap a full circle around before starting to turn to make "petals." Make sure the fabric is folded in half (you can glue the fabric in half before starting if it'd make it easier for you. But don't overdue it or the rosette will end up stiff and too thick.) Below is a picture of my first turn. I turn outward--top to bottom--to make a flatter rosette.
 I suggest putting a dab of hot glue on the rosette right before and after every turn. Just a tiny bit.
 Depending on what you like, you can make 2 turns per round, 4 turns, or a continuous set of turns. I did about 4 per round. When your rosette gets big enough, you might find it easier to move your finger and thumb to the top and bottom of the rosette to make it easier to hold, and help keep the rosette flat. See below. (If the rosette gets too thick, it'll dangle off your ear and won't look so good.)
 I used about 9" of fabric, but go with what you like. At the end, do one final turn-down and glue the edge on the bottom of the rosette. Snip off any extra fabric.
 Here are my finished rosettes from the 1"-wide fabric. I added a felt circle to the bottom, but decided not to do that with the .25" fabric because it made the earring thicker than I wanted.
 Here's another shot of the 1"-wide fabric earring.
 Immediately after finishing these, I started the smaller set with my strips of fabric that were .25" wide.
 See how much smaller these earrings turned out?
 I like the littler ones better. I think they're more subtle and less of a "statement." Which is what I prefer. Do you have a preference?
 Easy and fun to do. And who doesn't love saying, "I made them!" when someone gives you a compliment? Enjoy! :)
**If you make one of these projects, please be sure to link up your pics in my FLICKR Group! Thanks!**
Linking up here today:


Oct 19, 2011

Mooshy Bunny ~ Isn't he cute?!?


My first sewn animal. I love him!
Mooshy Bunny was made from an old GAP t-shirt (and a plain white one) that I'd been saving in my sewing stash for just the right project. This was it!
He was fun to make (though the jersey material was a bit tricky to sew at first. But then I got the hang of it). I love the end result. The tutorial can be found HERE at Chez Beeper Bebe. Love it!
Linking up here today:
 

Oct 17, 2011

Embroidered Wall Hanging ~ finished

 Yes, I was feeling super sappy last week and penned my heart-felt affection for my daughter in embroidery floss. Then I turned it into this below. I hung it in her room so that she
 can see it from her crib. I read it to her, word by word, the first time she went into her room after it was hung. The little smile of understanding on her face made me so glad I did it. (sigh)
Linking up here today:
{Sew} Modern Monday at Canoe Ridge Creations


Oct 15, 2011

Pom Pom Bib Necklace ~ So Pretty & Easy to Do

 So this past week I volunteered to make some jewelry for a community fundraiser and decided I needed to get to work figuring out something that looked smart and pretty at the same time. I found this awesome tutorial here for a beautiful pom pom bib necklace and got busy.
 I did my chain differently than the tutorial. I bought 6' of chain, jump loops, and lobster clasps and made my own chain at a length I liked (about 8" of chain on each side). I was very proud of myself for not only locating pliers (!) to cut the chain, but for also assembling the whole thing and making it look rather good! Right after I finished, I wanted to do another one. So I did.
 Not sure yet which necklace(s) I'm donating yet (I'm sort of in love with the gray one and want to keep it), but I know I'm going to be making some more in the next few days to try out some other fabrics and colors. Fun and easy. And aren't they pretty??
Linking up here today: 
 
Our Creative Spaces