Feb 25, 2013

Gymboree Knock-Off


You know, I look at these two pictures and part of me STILL wants that Gymboree top. I mean, I don't have an embroidery machine and that factory manufactured top looks so pulled together. But then I look at my cute little girl in the top her mama made her (as best she could, pulling ideas from a tiny picture online) and think, she's better off with this one. It's a better story.
 I had a good time putting this top together, improvising as I went. Once again, I started with Rae's basic Flashback Skinny Tee pattern (5T for my little one) and added a little poof in the sleeves, along with the tutu, and this embroidered bunny.
Can you see that I put ballet slippers on this bunny?? Adding the 3-D tutu and bow are the details I enjoy most. I talk about the really easy way to add a bow in this post from not too long ago, in case you're interested.
I also look at these pictures and think, they're not my best. I should've ironed that wonky collar. And I should've taken off my daughter's undershirt so there wouldn't be a goofy ridge on her chest, right above the bunny. But these are things I notice (...did you?).
My daughter loves her ballet class, hence my new obsession with shirts/tops/outfits depicting dancers. When I discovered that Gymboree had a line of "Glamour Bunny Ballerinas" back in the fall I was sorry I missed the boat!(amazing what eBay turns up)
My photo shoot with the little one was up and down. Her brother running up and down the hall was so much more exciting! And bribing her with Swedish Fish only went so far. When she was done, she was done.

Happy sewing, all!
Linking up with these parties.

Feb 19, 2013

PlayDay Dress Pattern Tester

It's done! With my husband gone for five days and my daughter needing a trip to the ER over the weekend, I haven't had much sewing time lately. But I did squeeze in this adorable dress by Heidi & Finn because I was picked to be a pattern tester! Let me tell you, I was sooooo excited. And the PlayDay Dress pattern did not disappoint. It was written beautifully and professionally, and was very easy to follow.
 And the outcome? How cute is this dress? Seriously. I love it.
And I love those little button flaps at the shoulder. This was a new technique for me and it was fun learning something new. I think this detail really sets this dress apart from others.
 Oh, what a ham! My daughter turned on the charm during our photo shoot. I'm wondering where she gets that hip pose from?
 So if you're interested in sewing up a quick, adorable knit dress for your little one, head over to Heidi & Finn's shop and pick up a pattern. It's just been released today!

PS: I'm linking up with these parties!

Feb 10, 2013

Easy Undershirts


Well, the winter certainly isn't over as we in the Northeast are recovering from the biggest blizzard I can remember since moving here five years ago. It's been wonderful, seeing all that fluffy white stuff! But also so cold! I'd been thinking for a while that I needed to make my daughter some undershirts. She has a few, but not enough. And whenever I try to add a sweatshirt on top of her shirt, she peels it off within the hour. With undershirts? No chance of shedding layers.
So because we've been housebound pretty much all weekend, I got to work sewing.
I adapted Rae's Flashback Skinny Tee for the pattern on all but the gray/pink shirt. (Basically, I just omitted the sleeves.)
For the gray top, the first one I actually made, I winged a pattern based on one of my daughter's store-bought undershirts. I had to gather the front a little bit, but...
...it still worked out. I like the skinny straps.

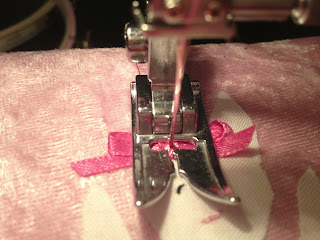
Do you like the little ribbons? I thought these undershirts could use a little femininity. And I think the bows do the job. It didn't take much to add them. Seriously. Here's your 10-second tutorial:
1. Make a little bow and adjust to the size you want. Pull the ends tightly.
2. Add Fray Check to the ends (if you want) so they don't fray and start to look ugly after a few wears.
3. Adjust your machine. I put mine on a straight stitch (A) and 0 stitch length. Tension remained the same. (It's basically what you do at the end of sewing a buttonhole.)
 
4. Next, line up your needle in the center of the bow. Do 3-4 stitches in place. Then move your needle over a smidge and do it again. I actually do three separate in-place stitches. Just to be sure.

5. Then, clip your threads and you're done! (More on the project above in a later post!)


My daughter found her undershirts while I was taking pictures and snatched them up, hugging them close to her chest. She has claimed them as her own. Good! And her favorite, the cupcakes of course. Oh, and I wanted to also mention that the cupcake shirt and the green shirt were new-fabric, but the other two were upcycled t-shirts.

It feels so good to make something so useful. Sometimes, I labor away at beautiful dresses and such and they get worn once or twice. These may not be uber-pretty, but they're functional. (And they saved me a few bucks too.) Can't beat that. Let me know if you make some of your own. I'd love to see them! 
Have a great week sewing!
PS: I'll be linking to these parties.