Apr 27, 2011

Spring Pillow

I finally finished this pillow this afternoon! Just in time to link up with Stitched in Color's Blogger's Pillow Party. Woot!

I so love the colors in this pillow! The robin's-egg blue is my absolute favorite and I went with the color-theme that reminded me of springtime--the blue eggs, the new green leaves popping up on trees, the yellow sunshine, the white dogwood blossoms, the red heat... Mmm. I do love spring!

The heart embroidery template came from the book Sew Charming. This pillow had several firsts for me including the hand-painted heart (my version of silk screening).
This was also my first attempt at embroidery and I have to say I really enjoyed it. I found working with a hoop very relaxing and the results came much quicker than I'd expected.

I attached batting to the back of the front (oh, that sounded funny) of this pillow and then hand-quilted the top. Another first.

This is my third time doing the envelope closure and the good news is it has gotten easier with each try. ;)

 And it was also my first time doing a hand-made label. 

 Overall, I enjoyed the process of making this pillow. It took a while, with many different steps, but I had a lot of fun dreaming it up and piecing everything together to create something pretty.

Blogger's Pillow Party
I'm also linking up at Fabric Tuesday, another fabulous blog with lots of inspiring work. 
Fresh Poppy Design

By the way, have you entered my giveaway yet?

Apr 26, 2011

Giveaway!

I'm hosting my first giveaway in honor of Mother's Day, which is right around the corner! I know there are a lot of crafty people out there who are also crafty moms (or grandmas or aunties or sisters). 
Aside from sewing and crafting, I also write and have a story published in Chicken Soup for the Soul: New Moms. The publishers sent me some extra copies and I thought it'd be fun to give one away!


For your chance to win a copy of Chicken Soup for the Soul: New Moms, just leave ONE comment here, telling me who this book would be for. It could be for yourself, a sister, a friend, etc. I'm just interested in knowing where it'll end up!

So that's it. Leave ONE comment by Monday, May 1. I'll do an old-fashioned drawing that evening and get the book out the next day, hopefully in time for Mother's Day. Make sure your email address is accessible so that I can get in touch about your address.

Thanks and good luck!


Comments closed.

Apr 24, 2011

Easter Outfits!

HAPPY EASTER! What a beautiful morning we had here: 76 and sunny. After a week of rain, clouds, and 40-degree weather, this was quite a blessing. The kids wore their new clothes to church. My daughter wore her sweet market skirt and my son wore his seersucker summer pants. Once again, both patterns came from tutorials on the beautiful and inspiring blog, MADE

My daughter also kept her hairclip in her hair all morning long. Unbelievable.

 We were very excited to run around after sitting (sort of) still during the hour-long mass.

 In the afternoon, as the sky darkened and the winds picked up, we headed outside once again, this time in search of the Easter Bunny.
He was a sneaky little bunny and hid lots of eggs in the trees, shrubs, and grass without even being seen! 


When the last egg was accounted for, we headed inside to devour the yummy sugary goodness inside.


My kids might not've been sporting a shiny satin dress or a cute clip-on tie, but I was nonetheless proud of their attire, as every stitch (or re-stitch--if that's a word) was sewn with oodles of love.

Apr 23, 2011

Easter Clothes Part II: Seersucker Pants

You've seen what my daughter's going to wear on Easter, now here's what my son is going to wear.
I splurged on a new shirt and then sewed these pants myself after getting all inspired by this fabulous tutorial for Kid Pants at Made.
 I sewed some pants for my daughter last spring--even crafted some potato stamps and added that to them. And I made my son some hanging around fleecy pants back when he was small. But it had been a while since I'd made something wearable (in public, that is). When I saw these Kid Pants, I just had to get myself some seersucker and give them a try. And let me just say the tutorial made it easy. Dana at Made explains things very well and includes awesome pictures to help you every step of the way.
Like she suggested, I used seersucker for these pants, and they do, indeed, scream SUMMER!
Since I've been on a quilting bent lately, it was nice to take a break and try something different.
Happily, my son agreed to model the pants and let me take some pictures. I'm so glad the pants fit. I just might try to make some more.
Tomorrow, I'll try to get some pictures up of the kids together sportin' their new duds!
Happy Easter!

Apr 22, 2011

Easter Clothes Part I: A Sweet Skirt

This Easter, I had this urge to make my kids some Easter clothes. When I was little, my parents always bought my sister and me a new dress and a new pair of shoes for Easter. We'd go to church truly decked out in our finest. We'd wear the palest pink or yellow or blue frock along with a pair of dainty, sweet shoes to match.

Well, now that I'm a mom myself, I thought I'd go with this idea, but instead of buying everything, I'd try to make the main pieces myself.

Enter the Market Skirt, which I made following this tutorial from MADE.
I showed you my sneak peak of this skirt a few days ago. So if you guessed "skirt" you guessed right - well done! Today, I found a little blue frilly shirt while I was out shopping and thought that it'd go well with the skirt (but I haven't checked to see if they match yet!).
I'm still looking for shoes...

But I did make this too:
Can you tell what it is? It's a scrappy flower hairclip. Just to, you know, match the skirt. A little top to bottom fluidity.
I also made a scrappy flower and hot glued a pin backing to it. I'm thinking about pinning the flower to the skirt here (above). Or pinning it to my daughter's shirt.
(I wish my pictures were better, but I'm traveling this week and not on my own computer with my own camera. Ack.)

On Saturday, I'll show you what I made for my son to wear on Easter Sunday!
(And yes, it's going to be a little matchy-matchy. Yes, I'm being one of those moms. And I'm loving it!)

Apr 21, 2011

Thrift Store Shopping

Recently, I stopped by our (somewhat) local Salvation Army to drop off some donations and to also peruse what I told my kids was
"an indoor yard sale."
I picked up this.
 And this. (Look at those three cute kids on the fence!)
 And this.
 But I am not entirely sure why. I don't drink tea. I don't have any empty cabinets in the kitchen. Hmmm. I think in the back of my mind I was dreaming about pincushions for the teacups. I was also just admiring the artistry of the China. China! 
Overhead at the store: "Geez, this is someone's full China set."
"(Low whistle.) Probably wedding gifts."
And I thought, Aw, how sad. But so generous too!
Not sure what I'll do with it all. Right now I'm casting long glances at my mismatched set as I walk around the kitchen, thinking, mulling things over, hoping to get inspired, but not in a rush to do so. Happy just to have found them for now.
What would YOU do with these items?? (Aside from never buying them in the first place, of course!)

Apr 20, 2011

Another Sneak Peak...

...at something in the works.
Any guesses??

Apr 18, 2011

Something I'm working on...

Mmmm... doesn't this look yummy? More to come...


Apr 16, 2011

My Banner Is MIA...

...and I don't know where it went. I am in the process of looking for it (with the help of my web designer). Stay tuned.

Apr 14, 2011

Kid's Map Quilt

I love making things for my kids! Especially things that really make them excited. This is one of them!


My son's latest interest is the United States of America and, in particular, all those funny states.  What initially got him hooked was the book, The Scrambled States of America Talent Show, by Laurie Keller, where each state has a quirky little personality. 

At home, discussion about the states had already moved to the continents and we'd been spinning our toy globe for weeks. But those countries are so small on a globe, and hard to get a really good look at. That's why these (roughly) 1-yard fabric panels were perfect for what I was going to do.
 
Because the USA side was slightly smaller than the World side, I sewed some strips of space (another big interest) fabric onto the ends. I did some random quilting lines, mostly following the latitude and longitude lines. I didn't worry about it being perfect.

And then for the batting, I used some thicker, poly/cotton blend (which I pieced together from scraps), and then let my son pick the binding fabric. (He picked this fabric because the big circles look like planets. How appropriate!)
Already, we've had a good time playing. I'll say, "Where's Colorado?...Ohio?...New York?...New Mexico?...Where do we live?" And my son will find it and point to it. (I think he's remembering the pictures on the states, but still.)
 Here he is showing me where we live.
Fun, easy quilt/blanket/toy that I'm sure will get lots of use. I can now officially pat myself on the back.
Hooray for the play quilt!

Apr 12, 2011

Quilting Quandary #1 Help needed!

OK. If you didn't already know, I'm new to the world of quilting. I'm learning as I go -- and I have a lot to learn! 

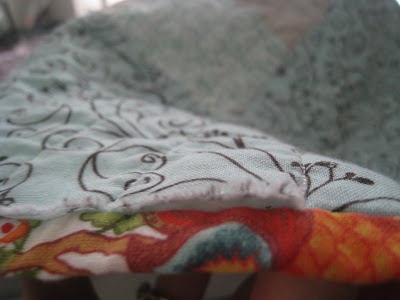
I just finished my second {real} quilt as in biggish size, lots of stitching, and binding that I made myself. (Whew--makes me tired just thinking about all that went into it!) So it made me quite sad/distressed/annoyed to find some HOLES after taking my quilt out of the dryer. This should've been the time for doing my happy dance, but instead, I was crouched over my quilt, needle in hand, trying to repair all the flubs.

One of the many:

 Closer view:
Argh! Why? Why? Why? 

Now this particular hole is right along the binding, but others were in the middle of the quilt, along the squares and along the orange piecing. Why did this happen?

Here is my short list of potential reasons:

1. I sewed too close to the ends of the fabrics, not leaving enough seam allowance?
2. The fabrics are not 'good enough'? (Only the gray is Kona. The rest is just your average fabric from Joann's.)
3. I didn't pre-wash my fabrics?
4. All of the above?
5. Um....?

If anyone has any thoughts or advice, please feel free to leave it. I definitely do not want this to happen again!

Apr 11, 2011

In Bloggy News...

Last week, Simply Modern Mom posted a picture I took on her blog! Check it out here! (It's the one with the sewing machine and the little girl!)

Also, Ceri at Inspired by Felix gave me a little mention on her blog last week and I'm happy to accept her kind award and pass it along to three other blogs that I enjoy! If you haven't been to Inspired by Felix yet, get over there and admire Ceri's work. Among my favorites right now are her gorgeous pillows!
So the rules of this award are that I can pass it along to 3 other blogs that I believe deserve some recognition. There are so many awesome blogs out there that it was hard to pick just three. But here are my choices (in no particular order):

* Handmade Homemaker - Such cute projects here with great pictures!
* Needle and Spatula - Kate can really sew. Her quilting projects are aMAzing!
* Blue Bird Sews - Fabulous quilts. Start ogling!

Congrats bloggers! If you would like to pass along the award, feel free to do so, but don't feel obligated. This is just my way of saying I enjoy your work and reading your blogs!

And one other thing...I did a project recently that Simply Modern Mom blogged about a while back. I think it turned out really well.
I used $1 unfinished wooden frames from Michael's, some chalkboard paint, some yarn, and hot glue (my cheaper, quicker alternative -- let's hope it holds, but so far so good!)

This set of frames is one of the first things you see when you come inside our home and, in case you're wondering, these are reminders for my visitors because my kids have food allergies. Gotta keep'em safe!

Have a good week!

~ Birds of a Feather Quilt ~

Yay! I'm done with my second {real} quilt! This is my Birds of a Feather quilt and if you look closely, you can see squares of birds, birdhouses, and eggs. 
I did some straight line stitching again for this quilt (mainly because I don't have a free motion foot yet). And I used masking tape this time to help me create straight(er) lines than last time
I'm not too crazy about the backing fabric. But I think it works well enough. If you want to hear about how I came up with this fabric, click here.
I think one of the best parts about quilting is taking the finished product outside for a photo shoot and I had loads of fun with this one! (Until I turned around, quilt tucked under my arm, to find a creepy guy in a pick-up watching me...Ah!)
I like my binding fabric and how the binding turned out in general. I did the ladder-stitch again and I did better on this quilt than my last one. Yes, practice does help! :)
I did have some troubles after I pulled the quilt out of the dryer. And I'm going to post my first quilting quandary later on this week. Hopefully, some readers can offer me some advice!
 And this is where my I begin to wonder if I've posted too many pictures of the quilt....hehehe....
Anyway, I'm linking up with Sew Modern Monday today at Canoe Ridge Creations. Check out the amazing work there!
{Sew} Modern Monday at Canoe Ridge Creations

Apr 7, 2011

My Creative Space - Idea Wall

For my Creative Space this week, I thought I'd post about my Idea Wall.
It's really quite simple -- some plastic sewn over at the ends (for reinforcement when hanging), two holes, and a couple 3M hooks.

I like to photocopy patterns from books and rip out ideas from magazines and think about them for awhile (even put them in a queue of sorts).
I have My Idea Wall hanging next to my bed. So when I'm sitting there, knitting or hand-sewing, or watching TV, or nursing the baby, or whatever, I can glance over at the projects I want to get to and think about them. Keeping them visible is important to me; if I put them in a folder and tuck them away, they're gone, perhaps forever. My Idea Wall keeps my ideas present. And I think of this as a big player in sparking my creativity, this simple, easy-to-create creative space. The Idea Wall.
I'm linking up with kootoyoo and a bunch more creative spaces!