Sep 24, 2012

Fall Hats for Kids


 I really love hats. They are cute and practical. I love putting my kids in hats all year round, something different for each season. I've done summer bucket hats and knitted all kinds of winter hats. I figured it was time to make some fall hats. Because why not? They keep the head warm when it's chilly and can hide all sorts of bed hair. Aside from that, it's extra sun protection. A triple "A" in my book.
 Inspired by this tutorial, you might recall that I made some newborn hats right away for my neighbor. Well, I have a few more friends having boys this fall, so I bought some knit fabric and made the two hats above (times four and counting).
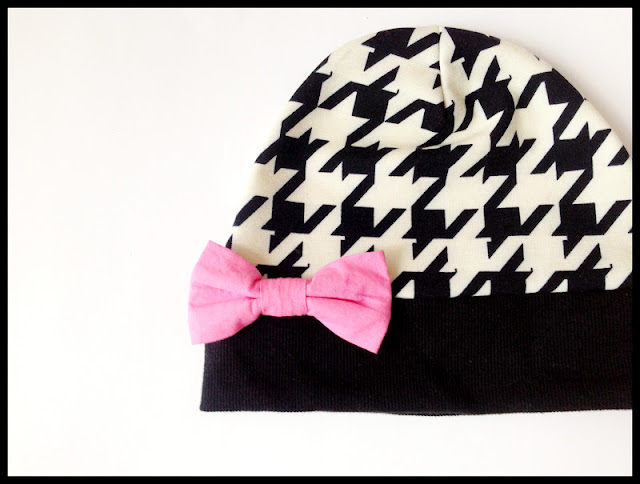
 Then I enlarged the pattern a bit and, with some trial and error, made these two hats for my daughter.
The hounds tooth fabric was leftover from a few projects I did last year like this scarflette and this skirt. I used some interlock black fabric for the bottom portion. The bow happened to come from a stuffed animal (who never wore it!). I just sewed it on.
The blue flower fabric below I bought at Girl Charlee. It's so soft and feminine.
While I was at it, I let my son choose his fabric of choice and made a hat for him too. It's so big compared to the newborns'! (And could've been a little bigger too, I think.)
The kids love their new hats and I love them in them!
Now I'm thinking...one for myself?
Happy sewing!

Big Kid's Pinafore

After posting the pinafore I made for my then-one-year-old, I realized I hadn't posted my big-kid pinafore yet.

 Well, she's 5-and-a-half, but my daughter really looks up to Clara! She had a lot of fun with her when Clara was in town. (I do believe this is when my daughter learned the fun of twirling.)
I made this pinafore for Clara using the size 5/6 pattern that I bought here. It fits well, but I'll be interested to know if it lasts her another summer. Clara is tall and thin, so it just might work.
The skirt she's wearing is the reverse side of this one that I also made for her this summer. (She prefers the other side, but her mom and I thought the orange/yellow side would be better for these pictures.)
Before she left, we convinced Clara to try on the reverse side of the pinafore. It's another orangey-flower print, but in a bigger scale. (The small orange-blue print can also be seen on this skirt that I made for my daughter.)
 I enjoyed practicing my sewing skills for an older girl. I was surprised, at first, at how much more fabric I needed to use. But of course it makes sense. They grow so fast.
 Thanks again to Clara for braving the cold morning patio in bare feet! I hope the clothes were a success back home in Canada.

Sep 14, 2012

Pinafore: A Second Summer

I thought it'd be fun to revisit one of my first sewn garments and post about how it's still getting some use! (And to also see how much my daughter has grown in a year.)

This is the pinafore I made last summer for my daughter. It was my first figure-it-out-without-a-pattern garment.
And here she is wearing it last summer as a 1 year old.
It's reversible too. And I love these two fabrics -- both from Joann's. If you look closely, you can see that both sides have a baking theme. My original post on the pinafore is here.

Now, at age 2 (in need of a bang trim), she's wearing it again. It's shorter on her, but still fits (I made the 3T size and so it works on the shoulders/chest area).
Now I know you can buy the pattern and I've uncovered the trick to making the pinafore "work." (For this one here, I handstitched the shoulder seams. I couldn't figure it out otherwise!) I bought the 5T pattern and made one for our little friend Clara. More on that in a future post. :)

Sep 8, 2012

Kiddie Bathrobes

     Is September too early to post about bathrobes? At least where I live, it's still hot and wearing a bathrobe is definitely not in the picture. 
 Anyway, I sewed these up back in the spring and I've been hanging onto the pics forever and finally figured I should just get them up on the blog. My kids aren't in the picture because these robes are going to be winter presents. On our first cold morning, I'm going to whip them out - SURPRISE! )

Anyway, here are some cute kids to fill in.
 The pattern is great. I saw it on Living with Punks and pinned it here. The most labor-intensive part was cutting out the pieces. But I suppose that's the case with a lot of patterns. Really, this one was very simple.
 The space robe is for my son and the pink/white whales for my daughter (is that way too obvious?). I made them the same size to make it easy. My daughter is growing fast. (On a side note, my 2-year-old and 5-year-old both wear 4T underwear. Isn't that crazy?)
I love the robes and hope they will too. They have never had a robe before (at first I didn't think robes were really a kiddie thing, but I came around).
Here's to Jack Frost and something to look forward to.

Sep 6, 2012

Scrappy Bean Bags

I've been reading up on the Kindergarten curriculum, and one of the "subjects" seems to be gross motor skills. Since we live in a condo building, we don't have access to the outdoors very easily. We can't just run out the back door and play t-ball or something at a moment's notice. It takes a little more effort to load up bags, strollers, wagons, etc. and take them down the elevator and around to the back of the building. So I came up with a game to play indoors that still feels like a game of ball and but just so happens to help with gross motor development in a very sneaky way.
Enter the Bean Bag Toss.

I'm sure this is not original, but for our needs, it seemed like a light bulb had just gone off. Why hadn't I thought of this before? During the course of a morning, I found a bunch of fabric scraps and made about a dozen 4" bean bags.
We put an empty shipping box, and a few big melamine bowls by the front door (after pushing aside all the shoes, bags, etc.). I put a line of masking tape on the floor and explained the "rules." The kids had to take turns trying to toss the bean bags in the containers. The box was one point, and each bowl was  two points (bonus for doing math while playing).
The kids had to take turns tossing the bean bags. We tried overhand and underhand.
Turns out the kids were better at this than I thought they'd be. And they had a lot of fun.
Look mama! It went in!
We now try this game in the afternoons before dinner, or right after dinner, when it's too hard to get outside for a second time that day. It's working well and keeping their interest! Mixing up the containers and the "rules" helps too.

Want to see what I did to make this easy game? Here we go:

First I cut out the squares. I used a 4.5' x 4.5" quilting square to trace the fabric.
Then I pineed them right sides together and sewed a double line with a 1/4" seam allowance. I left about a 2" opening for turning (I used a double line to make sure none of the little beads slipped out in case the thread loosened over time. I'm sure there are other ways to do this -- or not.)
Then I clipped the corners and trimmed the sides to get rid of the bulk.
Then I turned the squares right side out. I used a chopstick (yes, a chopstick - extremely convenient) to poke the corners. I don't have one of the cool tools to do this, but have found a chopstick works just fine.
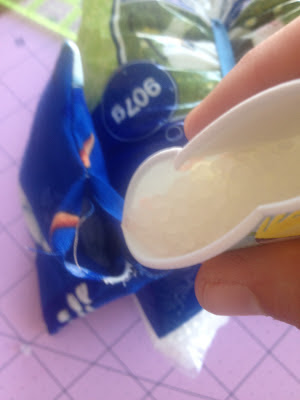
Then I poured the little beads into the bag, filling it about 2/3 of the way. (I erred on the side of less full than too full. I like the feeling of a less-full bag more, plus they're easier to sew shut!) The bag of beads I bought at Wal-mart. I can't remember what exactly they're called, but they were in a big bag (maybe 2 lbs.?) and rather cheap (maybe $5?).
Then I pushed all the beads aside, tucked in the open edges and sewed the last side shut, making sure to sew forward and backwards to really seal the opening.

And then it's time to play!
Not bad for a scrap-buster and a game.
Enjoy!

Sep 2, 2012

Easy Clothing Labels


Even though I don't own a shop or market my handmade goods, I love to put little labels on the things I make, especially the kids' clothes. A few months ago, I spent some time during my daughter's nap making a bunch for my stash.
Some with dinosaurs or initials. For others, I let the fabric speak for itself.
This one I haven't used yet. Can't decide where it should go. Maybe a bag down the road??
I used some solid fabrics and some prints. All I needed were some stamps and an iron.
For the stamps, I used some from Melissa & Doug that belong to the kids, along with some little plastic stamps that usually come in party-favor bags. The heart below was from a 4-pack that might've cost $1 at Target in the dollar-bin around Valentine's Day.
For the letters, I used this set from Hero Arts. I bought it at Joann's and used a 50% off coupon along with a 20% off your entire purchase coupon and got a GREAT deal. The stamp pad can be used on fabric (as per the directions on the back) and I bought that at A.C. Moore also with a coupon.
Are you excited to make your own? All you have to do is:
1. cut a square or rectangle of fabric
2. fold the two sides in about 1/4" and press
3. then fold the piece in half, hiding the folded edges inside
4. and press all around.
5. Then stamp your design and heat-seal it with the iron (I usually put some scrap-fabric between my label and the iron just in case the ink bleeds.).

Now it's easy to label anything I want! My "FUN" label went on my daughter's Every Little Thing Dress.
I labeled both of her Audrey Capes.
I put my initials inside my Easy Banded Top.
And I made a personalized label for Clara's skirt this summer, which she and her mom loved.
I'm starting to run low again, and know another afternoon of label-making is in order. Even though it can be tedious, I love selected which colors, pictures, and words will be forever-stamped (haha pun intended) in my kids clothes. Some of which, may end up being heirlooms. You never know!
If you make some of your own, I'd love to see them. Thanks for visiting!

*Update* As goofy as this sounds, I was inspired by my own post and made some more labels right away. My mom had left some stamps at my home for the kids to play with (which they happened to be doing yesterday while I made dinner) and I thought...hmmm, since they're out...label-making time! I think my mom's stamps are really cute and will look great inside my kids' clothes. :)