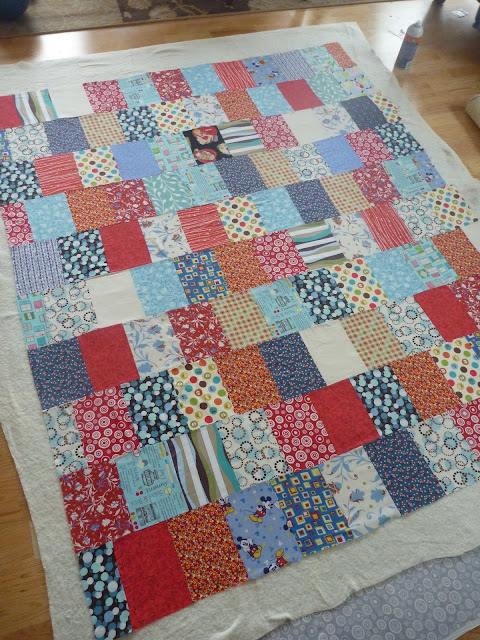
This is the third "big" quilt that I've basted and I have definitely learned as I've gone along. I didn't like the ripples I kept finding and figured the problem stemmed from the initial smoothing part on the floor.
Even though there are a lot of different methods, this is what worked for me.
1. Tape the backing fabric to the floor, working left to right. Previously, I'd start at the bottom corner, then do the bottom edge, the side, the top, and lastly the other long side.
I ended up getting ripples and getting very frustrated.
This time, I taped the bottom left corner, then went up. Then I simultaneously did the top and bottom sides, jumping back and forth, smoothing as I taped. Then I did the other long side, readjusting only a little to make it all perfectly flat.
Ooo, I felt pleased with myself!

2. Next, I sprayed the backing fabric and smoothed the batting as I went top to bottom. I knelt on the batting as I went and that didn't seem to be a problem.
3. Then, I went UP with the top fabric. I would spray and smooth, spray and smooth. I'd do it about two rows of blocks at a time.
When I got it all done, I was happy! I don't think it's perfectly perfect, but I think it's close, considering I was using some cheap spray that I had. (Elmer's, yes. It works, but I've never compared it to anything else and I'm sure I'd have better success with something that holds it all a little better.)
4. I love this part. Cutting away the extra stuff.
I did everything above in maybe a half hour?? I didn't look at the clock too much because it was my daughter's nap time and I had to hurry before picking up my son from pre-school. Anyway, it didn't take too long.
Later on, I did put some pins in the sandwich just because my living space is small and I didn't want a little one pulling too hard at my hard work and messing things up!
Later that night, I started quilting the sandwich! Woo-hoo! After doing my practice quilt, I felt confident enough to start stippling. I didn't begin this, however, until after 10pm (by the time I changed the needle, wound the bobbin, etc.), but it was so much fun. So much more interesting than straight-line stitching. I really like the "imperfect" and "close-enough" aspect of free-motion quilting. I kept at it for about twenty minutes before I was too tired and too worried I was going to stipple my hand.
Want to see my scarily small sewing space??? Usually, for big projects like this, I move my machine to the kitchen table...but like I said, it was after 10. And I was tired...
Anyway, it's progress! And I'm happy to be linking up here today:


Oh my gosh!! We have the Exact Same Chair! (but with the back in it)
ReplyDeleteLove the fun colors of your quilt. :)
Love the simplicity of this pattern.
ReplyDeleteGood work with the spray. So happy to see that someone else uses it.
ReplyDeleteYour stippling looks great! Way to go! It took me FOREVER to get up the nerve to try FMQ. And how do you like the spray baste? You don't have a problem spraying it on your wood floors like that? One reason I haven't tried it yet is that I worry about sticky gluey spray all over my floors, around the edges of the quilt.
ReplyDeleteThanks for linking up with WIP Wednesday. : )
It looks awesome!
ReplyDeleteI learned about taping the back down at sewing club and have done it ever since! I wish I knew how to machine quilt it with my small sewing machine :(
ReplyDeleteSpray baste! That's an idea that just might make me try quilting again. Love your blog. Lat quilt I made was a , ahem, king size spread for my waterbed. To get the backing straight I , um, nailed it to the kitchen floor (which was old cracked linoleum anyways) . Nailing is the best way to stretch a king size backing but i realize most kitchens aren't that big or crappy looking. So, tape and spray! Thanks!
ReplyDelete